Knowing how to remove a toilet seat is one of the most practical DIY skills a homeowner can have. Whether you are dealing with a cracked seat that needs replacing, stubborn grime hiding under the hinges that regular cleaning can’t reach, or you simply want to upgrade to a soft-close or quick-release model, the process is far simpler than most people expect. The entire job can take anywhere from five minutes for a modern quick-release seat to around thirty minutes if you are wrestling with corroded metal bolts on an older toilet. No plumber needed, no specialist tools required in most cases — just a clear understanding of your seat type and a few household tools. This guide walks you through every scenario: standard bottom-fix seats, quick-release mechanisms, hidden-fixing designs, top-fix seats, and even electronic bidet seats. You will also find targeted advice on how to loosen toilet seat bolts that refuse to budge, how to detach a toilet seat from the bowl without scratching the porcelain, and how to take off a toilet seat without tools when the design allows it.
How to Remove a Toilet Seat — A Full Walkthrough for Every Type and Situation:
Why You Might Need to Remove Your Toilet Seat:
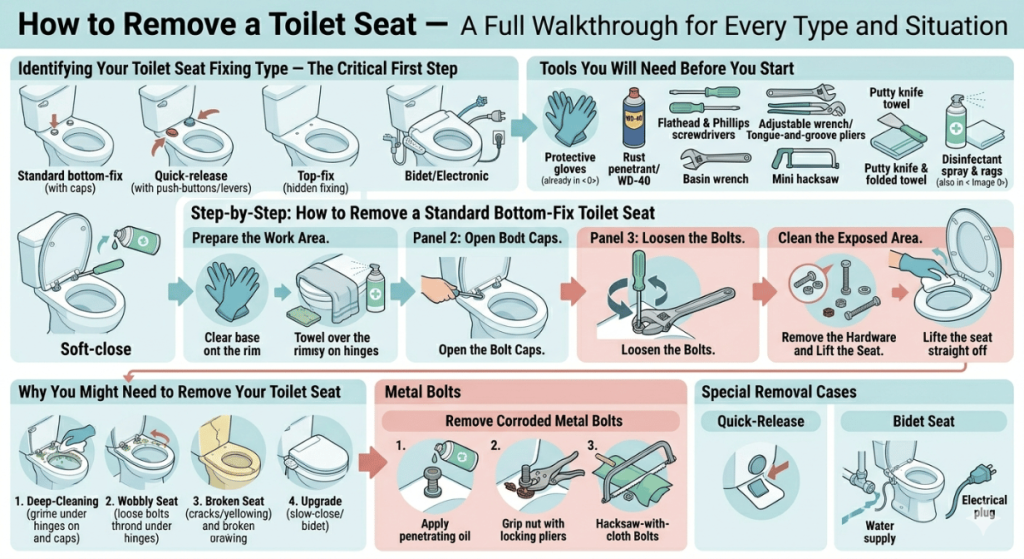
Before grabbing a screwdriver, it helps to understand the common reasons homeowners find themselves tackling this job. Bacteria and grime accumulate around the hinge area and bolt holes in ways that routine surface cleaning simply cannot address — removing the seat allows for a thorough deep-clean disinfection of the entire toilet bowl rim. A wobbly or shifting seat is another common trigger; this is usually caused by loose seat bolts that need tightening or outright replacement of the hardware. Visible cracks, yellowing plastic, or a broken lid are clear signs that the seat has reached the end of its serviceable life. Finally, many homeowners remove a perfectly functional seat simply to upgrade — swapping in a slow-close model, a quick-release design for easier cleaning, or a feature-rich bidet seat.
Tools You Will Need Before You Start:
Having the right tools ready before you begin prevents unnecessary trips back to the toolbox mid-job. For most standard seats you will need a flathead screwdriver (for popping open bolt caps), a Phillips screwdriver (for the bolts themselves), an adjustable wrench or a pair of tongue-and-groove pliers (to grip the nut underneath the bowl), and a pair of protective gloves. For stubborn or corroded hardware, add a can of rust penetrant or WD-40, a basin wrench for tight spaces, and — in worst-case scenarios — a mini hacksaw. A putty knife and a folded towel are also valuable for protecting the porcelain surface while you work. Cleaning supplies including a disinfectant spray and disposable rags should be on standby for the clean-up phase once the seat is off.
Identifying Your Toilet Seat Fixing Type — The Critical First Step:
Getting familiar with your fixing type before you begin is essential. The wrong approach can strip a bolt, crack a plastic cap, or even chip the porcelain. Stand over the toilet and look at the area where the back of the seat meets the bowl. Here is what you are likely to see:
- Standard bottom-fix seats have two small plastic or metal caps at the rear. These caps conceal the bolt heads.
- Quick-release seats feature small push-buttons or levers integrated into or beside the hinges. No tools required.
- Top-fix (hidden fixing) seats are common on modern skirted or back-to-wall toilets. All tightening and loosening is done from the top since the underside of the bolt hole is inaccessible.
- Soft-close seats use the same bolt system as standard seats but the hinges are slightly more complex. Take care when lifting.
- Bidet or electronic seats have additional water supply lines and electrical connections that must be disconnected before any hardware is touched.
Knowing which type you have before you start saves time, prevents damage, and determines whether or not you need any tools at all.
Step-by-Step: How to Remove a Standard Bottom-Fix Toilet Seat:
This is the most common scenario and applies to the vast majority of domestic toilets.
Step 1 — Prepare the Work Area:
Put on your protective gloves. Clear items from around the toilet base. Place a folded towel over the toilet rim to protect the porcelain from dropped tools. If the toilet is used heavily, give the hinge area and bolt caps a quick spray of disinfectant and wipe down before you begin.
Step 2 — Open the Bolt Caps:
Locate the two plastic covers at the back of the seat, directly where the seat meets the toilet bowl. Use your fingers or the tip of a flathead screwdriver to gently pop these caps upward. They are hinged and should flip open easily. If they are stiff from years of cleaning product residue, a small amount of warm water can help loosen them.
Step 3 — Loosen the Bolts:
With the caps open, you will see the tops of two bolts — typically Phillips or flathead. Place your screwdriver into the bolt groove and turn counterclockwise (remember: lefty-loosey). At the same time, reach underneath the toilet bowl to locate the corresponding nut. Hold this nut firmly in place with your adjustable wrench or pliers while you turn the bolt from above. This two-handed technique prevents the nut from simply spinning along with the bolt and is the most efficient method for how to loosen toilet seat bolts of this type.
Step 4 — Remove the Hardware and Lift the Seat:
Once both bolts are fully unscrewed, collect the bolts and nuts carefully so they do not fall into the toilet bowl. Then lift the seat and lid assembly straight upward off the bowl. Pull gently but firmly — the seat may be slightly sticky if it has been in place for a long time.
Step 5 — Clean the Exposed Area:
Use a disinfectant spray and a cloth to clean the now-exposed top surface of the toilet bowl, paying special attention to the bolt holes and the area that was covered by the hinges. This is the part that rarely gets cleaned during routine bathroom maintenance, and it is often where the most significant build-up of limescale and bacteria accumulates. According to NHS hygiene guidance on bathroom sanitation, thorough cleaning of all toilet surfaces is an important part of controlling the spread of household bacteria.
How to Remove a Quick-Release Toilet Seat — No Tools Needed:
Quick-release seats are specifically designed to be removed for cleaning without any tools at all. Look for small buttons or levers on the top or sides of the hinge unit, usually marked with a small arrow or symbol. Press both buttons simultaneously (or flip the levers, depending on the model) and lift the seat straight up off the mounting posts. The entire seat and lid assembly should come free in one smooth motion. To reinstall, simply lower the assembly back onto the posts and press down until you hear or feel a firm click confirming the seat has locked back into position. This system is one of the most practical upgrades for households that want to make cleaning easier and faster.
How to Remove a Toilet Seat with Hidden Fixings (Top-Fix Seats):
Hidden-fixing seats are common on modern close-coupled, back-to-wall, and rimless toilets where the underside of the toilet bowl is not accessible. The fixing mechanism is entirely self-contained within the hinge unit itself.
Look for a decorative plastic or metal cover plate at the back of each hinge. Use a flathead screwdriver to gently pry this cover away — it usually clips into place. Beneath it you will find a bolt head that tightens or loosens a built-in anchor system that grips the inside of the bolt hole from above. Turn the bolt counterclockwise to release the tension. Once both sides are loosened, the seat simply lifts off. No reaching under the bowl is required. The Wikipedia overview of toilet seat hardware variations provides useful background on how different mounting systems evolved in different markets.
How to Remove a Stuck Toilet Seat — Dealing with Corroded and Seized Bolts:
This is the scenario that causes most homeowners to hesitate. If your toilet seat has been in place for many years — particularly if it uses metal bolts and metal nuts rather than plastic — corrosion and mineral deposit build-up can weld the hardware together so effectively that a screwdriver alone will achieve nothing.
The recommended first step is to apply a rust penetrant spray such as WD-40 directly to both the bolt head and the nut underneath. Allow this to soak for a minimum of five to ten minutes — longer if the corrosion is severe. Then attempt the two-handed bolt-and-nut technique described above. A socket wrench with an extended drive can provide far more torque on stubborn metal nuts than standard pliers. If the bolt head has already been stripped and the screwdriver can no longer grip it, a bolt extractor bit is your next option. As a last resort, place a putty knife flat against the porcelain to protect it and use a small hacksaw to cut through the bolt shaft. Work slowly and steadily. The U.S. Consumer Product Safety Commission guidance on safe tool use is a useful reference if you are using cutting tools for the first time.
How to Remove a Plastic Toilet Seat Hinge Without Breaking It:
Plastic hinge mechanisms are more delicate than metal ones and can crack if forced. The key is to identify whether the hinge uses a pivot pin, a bolt-through system, or a click-in post. For pivot-pin styles, look for a small retaining clip at the end of the pin — this must be removed first with needle-nose pliers before the pin can slide out. For bolt-through systems, proceed as you would for a standard bottom-fix seat. For click-in post systems (common on quick-release models), the button-press method described earlier applies. Always use the minimum force necessary and let penetrant spray do the heavy lifting when resistance is encountered.
Safety Tips and What to Do After Removal:
Once the seat is off, dispose of it responsibly. Most toilet seats are made from polypropylene plastic or medium-density fibreboard (MDF), materials that are generally not accepted in standard recycling streams and should go into general waste. Check with your local waste management authority for confirmation. Before fitting a replacement, inspect the bolt holes in the toilet bowl for any cracks, chips, or stripped edges. If the porcelain around the holes is damaged, seek advice from a qualified plumber before proceeding. If everything looks clean and intact, you are ready to measure for and install your new seat.
FAQs
How do I know which type of toilet seat fixing I have?
Stand behind the toilet and look at the area where the back of the seat meets the bowl. If you see two small plastic caps that flip up, you have a standard bottom-fix seat. If there are push-buttons or levers on the hinges, you have a quick-release seat. If the hinge area looks completely smooth with no visible caps or buttons, you likely have a hidden-fixing or top-fix seat. In all cases, the fixing type determines your removal approach, so confirming this before you start saves time and prevents damage to the hardware.
Can I remove a toilet seat without any tools?
Yes, but only if you have a quick-release seat. These are specifically engineered for tool-free removal. All other seat types — standard bottom-fix, top-fix, and hidden-fixing — require at minimum a flathead screwdriver and a pair of pliers or an adjustable wrench. If your seat does not have a visible release button or lever on the hinge, assume that tools will be needed.
What should I do if the toilet seat bolts will not budge?
Apply a penetrating lubricant such as WD-40 or a dedicated rust penetrant spray to the bolt head and the nut underneath. Allow the product to soak for at least five to ten minutes. Then try the two-handed technique: hold the nut underneath with pliers while turning the bolt above counterclockwise with a screwdriver. If the bolt is completely seized due to corrosion, a small hacksaw can cut through the shaft. Always protect the porcelain with a putty knife blade placed between the saw and the toilet bowl surface.
How do I remove a toilet seat hinge that has rusted completely?
Spray the hinge with rust penetrant and leave it for ten to fifteen minutes. Use a socket wrench with an extended shaft for maximum leverage on the nut. If the nut has corroded beyond any grip, a nut splitter tool can crack the nut off the bolt without the need for sawing. For severe cases, a reciprocating saw with a metal-cutting blade, used very carefully with full porcelain protection, is the most effective approach. Once removed, replace all the hardware with stainless steel or nylon bolts and nuts to prevent the same problem recurring.
How do I detach a toilet seat from the bowl when the caps will not open?
If the plastic caps at the back of the seat are stuck shut due to cleaning product residue or mineral build-up, soak them in warm water for a few minutes and then try again. A thin flathead screwdriver inserted into the seam of the cap can provide enough leverage to pop it open. Do not use excessive force — the caps are made of thin plastic and will crack if pried too aggressively. If a cap has already cracked and cannot be opened, you can often access the bolt shaft from below by working with a long socket wrench instead.
How long does it take to remove a toilet seat?
For a modern quick-release seat, the removal takes well under a minute. A standard bottom-fix seat with plastic hardware in good condition takes five to ten minutes including prep and clean-up. A top-fix or hidden-fixing seat typically takes ten to twenty minutes for someone doing it for the first time. A seat with severely corroded metal bolts requiring penetrant spray, extended soaking, and possibly cutting can take thirty to forty-five minutes. The key variables are seat type and the condition of the fastening hardware.
Are all toilet seat bolts the same size?
No. Bolt diameter and length vary by manufacturer and seat model. Most modern plastic bolt assemblies are standardised to fit standard-width toilet bowl bolt holes (typically around 6mm diameter), but the length of the bolt shaft and the thread pitch can differ. Metal bolt assemblies on older toilets are even more variable. When purchasing replacement hardware separately, it is worth bringing the old bolt and nut to the hardware store for a direct comparison, or consulting the seat manufacturer’s spare parts documentation.
How do I remove a quick-release toilet seat if the button is broken?
If the release button mechanism has failed or broken, the seat can often still be removed by accessing the mounting post from below or by gently prying the hinge body upward from the mounting post with a flathead screwdriver. The degree of difficulty depends on the specific brand and design. Some quick-release systems can also be converted back to a standard bolt-through mounting using a hardware kit available from the seat manufacturer. Consult the manufacturer’s installation manual or customer support line for model-specific guidance before applying force.
Do I need to turn off the water supply before removing a standard toilet seat?
No. Removing a standard toilet seat does not involve the water supply in any way. The seat attaches to the top of the toilet bowl only and is entirely separate from the flushing mechanism, the fill valve, and the water supply line. You only need to shut off the water supply when removing a bidet seat or an electronic smart seat that has a water inlet connection, or if you are performing broader toilet repairs at the same time.
How do I dispose of an old toilet seat responsibly?
Most toilet seats — whether made from polypropylene plastic or MDF-based materials — cannot be placed in household recycling bins. They should be placed in general waste. However, local authority guidelines vary, and some areas have specific provisions for hard plastic disposal at household waste recycling centres. Check with your local council or waste management provider for the most accurate current guidance. The metal bolts and nuts can often be placed in a metal recycling stream.
What is the correct way to measure for a replacement toilet seat after removing the old one?
Measure the length of the toilet bowl from the centre of the bolt holes at the rear to the front lip of the bowl. A round bowl typically measures around 16.5 inches (42cm) while an elongated bowl measures approximately 18.5 inches (47cm). Also measure the width at the widest point and the distance between the two bolt holes (centre to centre). These three measurements will allow you to identify a correctly fitting replacement. Purchasing the wrong shape is a common mistake — an elongated seat on a round bowl will overhang dangerously at the front and presents a safety risk.
When should I call a plumber instead of removing the seat myself?
Consider calling a licensed plumber if you notice cracks in the toilet bowl porcelain around the bolt holes, if bolts are so corroded that cutting tools are needed and you are not confident using them safely near porcelain, or if you are removing a bidet or electronic seat with water inlet connections you are unfamiliar with. For straightforward seat removal on a standard toilet, a plumber is rarely necessary. The Chartered Institute of Plumbing and Heating Engineering (CIPHE) recommends always consulting a registered professional when structural or mechanical toilet components are involved.
How do I remove a soft-close toilet seat without damaging the damper mechanism?
Soft-close seats use small hydraulic dampers inside the hinge to control the lowering speed. The seat itself is removed in exactly the same way as a standard bottom-fix seat — open the bolt caps, unscrew the bolts while holding the nuts, and lift the seat off. The damper mechanism is fully enclosed within the hinge housing and does not require any special handling during removal. However, avoid dropping the seat or hinge unit onto a hard floor, as the damper cylinders can crack under impact. Store the removed seat flat rather than stacking items on top of the hinge housing.
Can I reuse the existing bolts when installing a new toilet seat?
This depends on the condition of the existing hardware and whether the new seat’s hinge is designed for the same bolt diameter and spacing. If the existing bolts and nuts are plastic and in good condition with no cracking or stripping, they can sometimes be reused. However, since most new toilet seats come supplied with their own mounting hardware matched to the specific hinge design, it is almost always better to use the new hardware. Mixing old bolts with a new hinge can result in poor fit, movement, or a seat that works loose over time.
How do I take off a toilet seat when the toilet is very close to the wall?
Tight installation spaces make reaching under the bowl for the nut very difficult. A basin wrench — a tool with a pivoting jaw on a long shaft, widely used in plumbing for exactly this type of confined access situation — is the ideal solution. A flexible socket extension on a ratchet wrench can also work. Alternatively, if the seat uses plastic wing nuts underneath, these can sometimes be turned by hand once you apply penetrant spray to free any sticky residue. Patience and a torch for visibility are your most important assets in this situation.


Leave a Reply