Installing a toilet seat is one of the most satisfying DIY home maintenance tasks you can complete in under thirty minutes — often in under ten. Whether you are fitting a brand-new seat onto a freshly installed toilet bowl, replacing a cracked or wobbly seat that has finally given up, or upgrading to a modern soft-close or quick-release model, the process is genuinely straightforward once you understand which type of seat and which fixing system you are working with. This guide covers every scenario in plain, practical terms: standard bottom-fix seats, top-fix seats for modern skirted toilets, quick-release designs, and soft-close mechanisms. You will also learn how to measure correctly before buying, how to secure a toilet seat so it stays firmly in position, how to fix a toilet seat to the bowl when the hardware is awkward, and the common installation mistakes that cause wobble, misalignment, and premature wear.
How to Install a Toilet Seat — Step-by-Step for All Fixing Types and Bowl Shapes:
Measuring Your Toilet Bowl Before You Buy — Why Getting This Right Saves Time and Money:
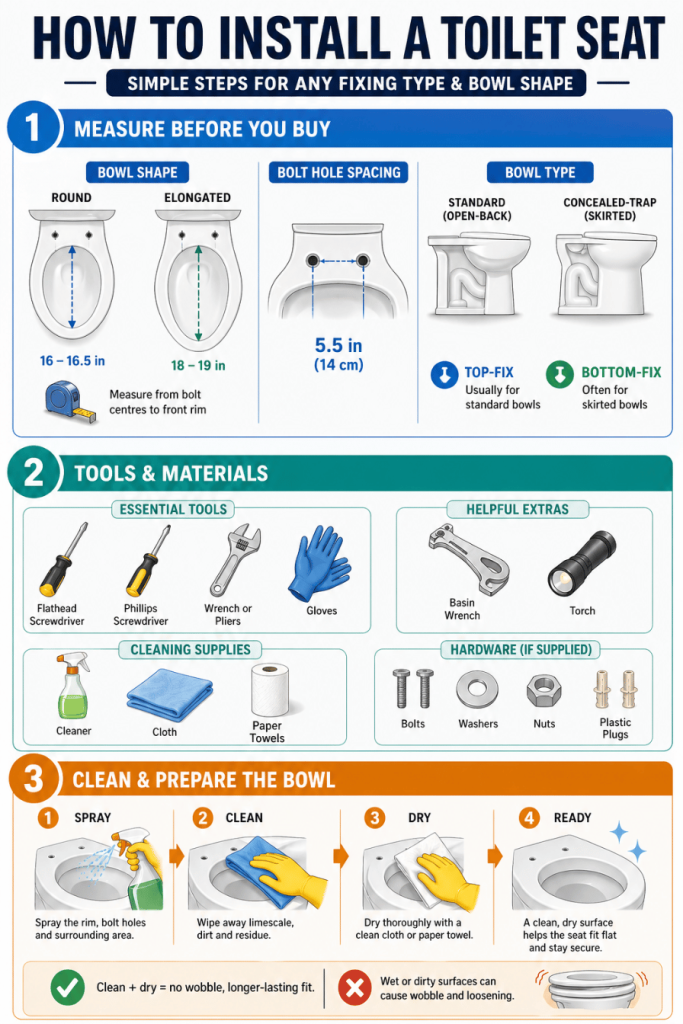
One of the most preventable DIY frustrations is purchasing a toilet seat that simply does not fit. Toilet bowls come in two standard shapes — round and elongated — and the seat must match the bowl shape exactly. According to measurement guidance published by the American National Standards Institute (ANSI), an elongated bowl typically measures around 18 to 19 inches from the centre of the mounting bolt holes to the front rim, while a round bowl measures approximately 16 to 16.5 inches. You can confirm which you have by placing a tape measure at the midpoint between the two bolt holes at the back of the bowl and measuring forward to the front centre edge.
Also measure the distance between the two bolt holes (centre to centre). The industry-standard spacing is 5.5 inches (approximately 14 cm), and the vast majority of toilet seats are manufactured to this dimension. However, some European and older domestic models vary, so always verify before purchasing. Finally, note whether your toilet bowl is a standard open-back design or a concealed-trap (skirted) model, as this affects which fixing type — top-fix or bottom-fix — you will need.
Tools and Materials Needed for Toilet Seat Installation:
Before beginning, gather everything you need so the job runs without interruption. For most standard installations the list is short: a flathead screwdriver, a Phillips (cross-head) screwdriver, an adjustable wrench or pliers, and a pair of protective gloves. For more confined or awkward installations add a basin wrench for reaching under the bowl in tight spaces, and a small torch for visibility. Have cleaning supplies ready — a disinfectant spray, a clean cloth, and paper towels — to prepare the mounting area before fitting the new seat. If the new seat comes with its own hardware kit (bolts, nuts, washers, plastic plugs), keep all components organised and accounted for before you start.
Cleaning and Preparing the Toilet Bowl Surface Before Fitting:
This step is consistently overlooked and consistently causes problems. Any residue of limescale, old cleaning products, or the adhesive residue left by previous rubber bump-stops can prevent the new seat from sitting flush and level on the bowl rim. Spray the entire top surface of the bowl rim, the bolt holes, and the surrounding area with a bathroom disinfectant or a bicarbonate-based cleaner recommended by public health hygiene guidelines. Wipe clean and dry thoroughly. A dry mounting surface ensures the seat sits flat and that rubber washers or stabilising pads grip properly from day one. Installing a seat onto a wet or residue-covered surface is one of the most common causes of early wobble.
How to Fit a Standard Bottom-Fix Toilet Seat — The Most Common Installation:
This method applies to the majority of domestic toilets and involves tightening nuts underneath the toilet bowl.
Step 1 — Unpack and Identify the Hardware:
Open the new seat’s packaging and lay out all components. A standard bottom-fix kit will include two bolts, two nuts (often wing nuts or plastic hex nuts), two rubber washers, two plastic spacer washers, and decorative bolt caps. Some kits also include a plastic mounting plate or hinge adjuster. Familiarise yourself with each component before fitting — this prevents mid-installation confusion.
Step 2 — Position the Seat and Align the Bolt Holes:
Place the closed seat and lid assembly onto the bowl rim and slide it backward until the hinge unit sits over the two bolt holes. The back of the seat hinges should align perfectly with the bolt holes, and the seat should look centred on the bowl from front to back and side to side. Do not bolt anything down yet — check alignment visually first.
Step 3 — Insert the Bolts:
With the seat positioned, open the bolt caps on the hinge housing (these are the small decorative covers that conceal the bolt heads). Drop the bolts down through the hinge holes and into the bowl’s mounting holes. The bolt should slide cleanly through both the hinge and the bowl hole. If resistance is felt, check that you are using the correct diameter bolt and that the hole is free from debris.
Step 4 — Attach and Hand-Tighten the Nuts:
Reach underneath the bowl to locate the end of each bolt. Thread the rubber washer onto the bolt first, followed by the plastic washer, and then the nut. Hand-tighten both nuts until snug — do not use tools yet. At this stage you want the seat to still be slightly adjustable so you can check its position.
Step 5 — Check Alignment and Final Tighten:
With both nuts hand-tight, lower the seat and lid onto the bowl and check that it is centred, not tilted to one side, and that the front edge of the seat is parallel to the front rim of the bowl. Make any small adjustments by gently nudging the hinge unit left or right. Once happy with the position, use your screwdriver to hold the bolt head in place from above while you tighten the nut from below with the wrench or pliers. Tighten each side gradually and alternately — a little on the left, then a little on the right — to keep the seat centred. The correct final tightness is firm but never overtightened. Plastic hardware, in particular, can crack if too much torque is applied. A useful rule of thumb: hand-tight plus approximately a quarter-turn with the wrench is sufficient for plastic nuts.
Step 6 — Snap Down the Bolt Caps:
Once both bolts are secure, press the decorative bolt caps down firmly over the hinge area until they click into the closed position. This conceals the hardware and prevents moisture from accumulating around the bolt heads.
How to Install a Top-Fix Toilet Seat — For Modern Skirted and Back-to-Wall Toilets:
Top-fix seats, also called concealed-fixing or top-mounting seats, are designed for toilets where the underside of the bowl is not accessible — including close-coupled models with a fully enclosed base and back-to-wall or wall-hung toilets. All fixing is completed entirely from above the bowl, making this system particularly practical in tight bathroom spaces. As noted in guidance from WaterMark-certified plumbing product standards in Australia, top-fix hardware is now standard on a wide range of contemporary toilet models internationally.
Installing the Expansion Plugs:
The top-fix kit will include two expanding plastic plugs or anchor inserts. Push each plug halfway into the bowl’s mounting holes — the plug should sit flush or just proud of the bowl surface at this stage. If resistance is encountered, a tiny amount of water applied to the rubber surface of the plug acts as a lubricant without causing any damage.
Fitting the Hinges and Washers:
Place the metal washer from the kit onto the top of each plastic plug. Then place the hinge unit (the component that the seat will eventually clip onto) on top of the washer, aligning its central hole with the plug below. Insert the bolt through the hinge hole and screw it clockwise into the expanding plug beneath. As you tighten the bolt, the expanding plug grips the inside of the bolt hole, creating a secure anchor — no nut needed underneath. Tighten both bolts evenly using a screwdriver until the hinges are fully immovable.
Attaching and Adjusting the Seat:
Once both hinge posts are firmly fixed to the bowl, press the toilet seat assembly down onto the hinge posts. You should hear or feel a click as the quick-release mechanism locks the seat onto the posts. Check the seat’s position — it should sit centred, level, and stable. If minor adjustment is needed, the bolt on each hinge can be slightly loosened to shift the hinge forward or backward, then re-tightened. Once the position is confirmed, snap the decorative hinge caps into place over the bolt heads to complete the installation.
How to Mount a Quick-Release Toilet Seat for Easier Long-Term Cleaning:
Quick-release seats are installed using either a bottom-fix or top-fix bolt system as described above — the only difference is in the hinge mechanism itself. Rather than the seat being permanently attached to the hinge posts, a quick-release seat clicks onto and off the posts at will. The key installation consideration is ensuring the mounting posts (whether bottom-fix or top-fix) are absolutely stable before clicking the seat on. Any movement in the mounting post will translate into a wobbly seat. Once the posts are fully tightened and you have verified they do not shift when you apply lateral pressure, click the seat onto the posts, test the release mechanism several times, and confirm that it both locks and releases cleanly.
How to Secure a Toilet Seat That Keeps Moving — Fixing Wobble After Installation:
A newly installed seat that wobbles almost always comes down to one of three causes: undertightened nuts, missing rubber washers, or an unlevel bowl rim surface. The first fix is to tighten the nuts further, alternating sides to maintain centre alignment. If the seat still moves after re-tightening, check that the rubber washers are correctly seated between the metal hardware and the porcelain — these act as grip pads and vibration dampeners. Most seat kits include these as standard, but they are sometimes discarded accidentally during unpacking. If the bowl rim is uneven due to mineral build-up, a thorough descaling clean and re-dry before reinstalling can make a significant difference. Nylon lock nuts are also available as an upgrade over standard plastic nuts — as noted in technical guidance from the Chartered Institution of Building Services Engineers (CIBSE), nylon-insert fasteners resist vibration-induced loosening far more effectively than standard threaded nuts.
Safety, Hygiene, and Long-Term Maintenance After Installation:
Once the seat is fitted, there are a few final checks worth completing. Sit on the seat to test its stability under realistic load — it is easier to make adjustments now than after weeks of use. Confirm the lid closes fully and, if it is a soft-close model, that the slow-close mechanism operates smoothly without the lid stopping partway. The NHS infection control guidance for domestic bathrooms recommends cleaning all toilet surfaces, including under and around the hinge area, regularly using an anti-bacterial product. Periodically check that the mounting nuts have not vibrated loose — a quick check every few months takes seconds and prevents the seat from developing a wobble that is more disruptive to correct later.
FAQs
How do I know if I need a top-fix or bottom-fix toilet seat?
If your toilet has a fully enclosed or skirted base — such as a back-to-wall, wall-hung, or close-coupled model where the underside of the bolt holes is hidden inside the ceramic shroud — you need a top-fix seat. If you can reach underneath the back of the toilet bowl and access the bolt holes from below, a standard bottom-fix seat will work. Many modern seats come supplied with both hardware types in the box, allowing you to choose based on your toilet’s design.
What is the standard bolt hole spacing for toilet seats?
The industry-standard distance between the two mounting bolt holes (measured centre to centre) is 5.5 inches (approximately 14 cm). The vast majority of toilet seats manufactured for the domestic market are made to this specification. However, some older or specialist models deviate from this standard, so always measure your existing bolt hole spacing before purchasing a replacement.
How tight should toilet seat bolts be?
Toilet seat bolts should be tightened to firm — not forceful. For plastic hardware, hand-tight plus approximately a quarter-turn using a screwdriver or wrench is the correct target. Over-tightening plastic nuts is one of the most common installation errors and can crack both the nut and the porcelain rim of the toilet bowl. Metal hardware tolerates slightly more torque, but the same principle applies: secure and stable, not maxed out.
Can I attach a toilet seat without going underneath the bowl?
Yes. A top-fix seat eliminates the need to reach underneath the bowl entirely. The expanding plug anchor system operates entirely from above, making it the recommended choice for wall-hung toilets, skirted bowls, and any installation where space is too confined to work comfortably below the rim. Most major bathroom retailers stock top-fix seats as standard.
Why does my new toilet seat keep sliding sideways?
A seat that slides left or right after installation is almost always caused by undertightened mounting hardware. Remove the bolt caps, tighten both nuts evenly by an additional quarter-turn, and re-test. If sliding continues, check that the rubber washers are correctly placed between the metal bolt components and the porcelain, as these provide the friction grip that holds the hinge unit stable. If the toilet bowl’s mounting holes are slightly oversize or irregularly shaped, replacing the standard nuts with larger-diameter flange nuts or rubber-coated nuts provides a more secure anchor.
How do I fit a toilet seat when the bolt holes are very close to the wall?
This is a common challenge in compact bathrooms. A basin wrench — a long-handled plumbing tool with a pivoting jaw — allows you to reach and tighten nuts in extremely confined underside spaces. Alternatively, switching to a top-fix seat removes the problem entirely since no access underneath is required. If using bottom-fix hardware in a tight space, tighten the nut as far as you can reach by hand, then use a flexible socket extension on a ratchet driver to achieve the final tightening torque.
Is it possible to mount a toilet seat without any tools at all?
On a quick-release seat with top-fix anchors, minimal tooling is required — a flathead screwdriver is enough to tighten the anchor bolts. Some premium seat models feature a completely tool-free installation system using hand-tightening wing nuts and hand-press anchor plugs. For standard bottom-fix seats, at minimum a screwdriver and a pair of pliers or a small wrench are needed to achieve a secure fitting.
How do I install a soft-close toilet seat correctly?
A soft-close seat installs using the same bottom-fix or top-fix hardware as any other seat. The soft-close mechanism is entirely contained within the hinge dampers and requires no special setup steps. The one important precaution is to never force the lid closed — always lower it gently until the damper engages and takes over. Forcing a soft-close lid closed can damage the internal hydraulic damper, reducing its lifespan significantly. Allow the mechanism to do its job from the first use.
How do I secure a toilet seat on a rimless toilet?
Rimless toilets use the same bolt hole positions as standard rimmed bowls, so standard seat hardware fits without modification. The difference is that rimless bowls have no inner rim ledge, meaning the seat rests only on the outer top surface of the bowl. Ensure that the rubber pads or bumpers included with the seat kit are correctly fitted to the underside of the hinge area, as these are the primary contact points between seat and bowl on a rimless toilet and are essential for stability.
What should I do if the new seat’s bolt holes do not line up with the bowl?
If the bolt holes in the new seat’s hinge do not align with the bowl’s mounting holes, you have most likely purchased a seat with a different bolt spacing or the wrong shape (round versus elongated). Return the seat and recheck your measurements. If the spacing is correct but the holes are slightly misaligned, a hinge with an adjustable slot rather than a fixed hole allows several millimetres of fore-aft movement to correct minor alignment issues. These adjustable hinges are available from most plumbing and bathroom suppliers.
How long does it take to install a toilet seat?
For a first-time DIYer fitting a standard bottom-fix seat with plastic hardware in good condition, the job typically takes fifteen to twenty minutes including measurement checks and clean-up. A top-fix seat installation is slightly faster — around ten to fifteen minutes — because no underside access is needed. A quick-release seat on pre-fitted hinge posts takes under two minutes once the posts are secured. Allowing for the cleaning and drying step before installation, budget around thirty minutes in total for a complete, careful first-time installation.
Can the wrong toilet seat cause injury?
Yes. An incorrectly sized seat — particularly an elongated seat placed on a round bowl — will overhang the front of the bowl and is liable to shift or crack under load. The U.S. Consumer Product Safety Commission (CPSC) has noted toilet seat failures as a source of minor household injuries, typically involving pinching or unexpected seat movement. Always match seat shape to bowl shape precisely, and confirm the seat is stable under realistic load before returning the bathroom to regular use.
How do I install a quick-release toilet seat hinge onto a new toilet that has no existing holes?
If you are fitting a seat to a brand-new toilet bowl that has no pre-drilled mounting holes, the bowl is likely a specialist model. Most standard toilet bowls are manufactured with pre-drilled holes as standard — if yours appears not to have them, check whether they are concealed by factory-fitted protective plugs, which must be removed before installation. Drilling new holes into toilet porcelain is not a standard DIY task and risks cracking the bowl; consult a qualified plumber if the pre-drilled holes are genuinely absent.
How do I know when a toilet seat needs replacing rather than just re-tightening?
Physical cracks in the seat or lid, persistent yellowing or discolouration that cleaning cannot remove, a hinge mechanism that has fractured or seized, and a seat that wobbles regardless of how tightly the bolts are set are all clear indicators that replacement is overdue. According to general plumbing maintenance guidance, toilet seats typically last between five and ten years under normal domestic use, with plastic seats at the lower end of that range and thermosetting resin or duroplast seats lasting toward the upper end.
Is it worth hiring a plumber to install a toilet seat?
For a standard or quick-release seat on a conventional toilet, hiring a plumber is unnecessary — this is genuinely a beginner-level DIY task. Professional labour becomes worthwhile when installing a bidet seat with a water supply connection, dealing with a heavily corroded or damaged mounting area that requires porcelain-safe repair work, or installing a wall-hung toilet’s seat where the toilet itself needs to be inspected at the same time. If labour is required, the CIPHE (Chartered Institute of Plumbing and Heating Engineering) recommends always using a registered plumber for any work involving the water supply line.


Leave a Reply