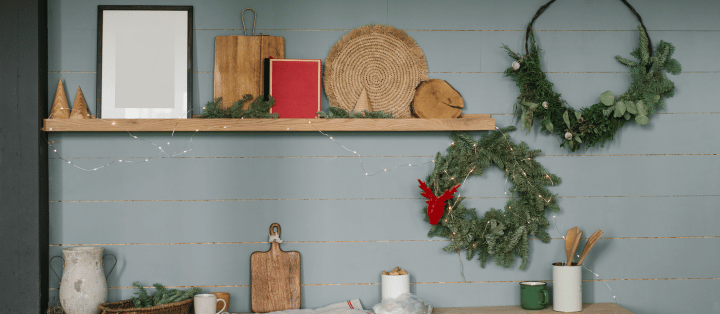
During festivals, especially on Christmas Eve, a garland can be a piece of decorative art for your space. Regarding this, you may dress up your kitchen with a stringing garland above your cabinets for the holidays. It is a perfect way to add festive cheer without it getting in the way.
The key is to do it properly to look evenly spaced, not droopy. Also, you should attach it securely to avoid falling onto your countertops. And for this, you must know how to hang garland above kitchen cabinets.
You will need command hooks, adhesives, tapes and the garland you choose to hook above the kitchen cabinet. You can decorate the garland with ribbon and art pieces once you hand it safely. For most cases, the garland should be between 18-inches to 24-inches.
How To Hang Garland Above Kitchen Cabinets
A suitable garland can enhance the appearance and aesthetics of your home. You can shape the garland differently and add different decorative items to it. With proper hanging, the garland will be the focal point in your kitchen during festivals.
Step 1: Choose the Right Garland for Above Your Cabinets
For the garland above the cabinets, choose something that fits the kitchen style and complements your cabinetry. For instances:
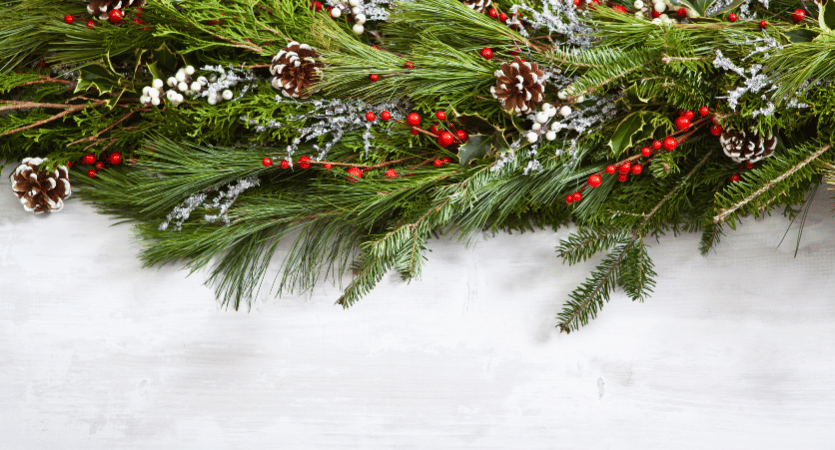
- Cinnamon sticks or a berry garland can be excellent choices for a rustic look; try pine cones. It will give a nice appearance to any space.
- You can select red and green felt or popcorn garlands if you want a more traditional feel. They are classic garlands that go with any style.
- Paper snowflakes, tinsel, or ribbon candy garlands would be perfect for a whimsical vibe.
Whatever garland you choose, make sure it’s rated for indoor use. Also, it should be manageable, or it may fall from the higher space and damage the cabinet. As a general rule, the lighter and more flexible the material, the easier it will be to drape artfully.
Step 2: Gather the Proper Tools and Hardware

You’ll need a few essential tools to hang garland for decorations above your kitchen cabinets. When you have the right tools, hanging the garland will be easy and safe.
Command hooks:
Command hooks or nails are essential to secure the garland in place. Command hooks are great because they don’t damage walls. Also, you can remove them quickly. Small nails also work well for hanging lightweight garlands. You’ll need to space the hooks or nails about 3 to 5 feet apart.
Ribbon and strings:
Next, you should get ribbon, string, or twine to attach the garland to the hooks or nails. You may choose a pretty ribbon that matches your garland and kitchen decor.
Step ladder:
Make sure you have a step ladder or a small ladder. It will be crucial to reach higher cabinets. You must avoid balancing precariously on chairs or countertops! Or else you may trip over and fall. It will enhance the risk of injuries and even damage the cabinet.
A ladder will allow you to install hooks safely, tie on a ribbon, and adjust the garland until it’s hanging just right.
Get a level:
Finally, get a level. It ensures that your garland is evenly hung for the best look. An evenly hung garland will make your kitchen look extra special for the holidays. It also gives a friendly and pleasant professional style to the garden.
Step 3: Measure and Mark Where to Install Hooks
You must choose the right length and width of the garland. If it is shorter or narrow, it might not look good above the kitchen cabinet. Also, the cabinet space will look empty if it is too thin and small. So, you must measure for proper spacing of the hooks for the garland to look eye-pleasing.
- First, measure the space between the cabinets where you want to hang the garland. Then, determine how far the hooks should be.
- Spacing the hooks 18 to 24 inches apart for most garlands works well.
- Next, use a tape measure and pencil to mark the spot for each hook. Hold the end of the tape measure at one end of the space.
- Then, you should make a small pencil mark at the 18 to 24 inches.
- Move the tape to that mark and measure again for another pencil mark. Repeat until you have marks for each hook.
Position the outermost hooks 6 to 8 inches from the ends for the most natural drape. It prevents the garland from drooping too close to the window frame. Also, ensure an evenly spaced garland with a level for a professional look.
Step 4: Install Hooks and Use Adhesive
You’ll need to install hooks at the top of the cabinets. Providing anchor points for the garland above your kitchen cabinets is essential.
Use a stud finder to locate the wall studs behind your cabinets. Then, you can attach the hooks directly to the studs. It offers the most secure hold. Also, remember to mark the stud locations on the wall above the cabinets with a pencil.
After marking the position of the hook, drill pilot holes. Then safely attach the hooks to the studs with screws. You must repeat the process to install the remaining hooks.
Next, you can use slight adhesive on the wall to strengthen the garland further. You can choose a waterproof adhesive to stick to the garland. It will safeguard the garland from falling over the cabinet and damaging it.
Step 5: Hang the Garland
Once the hooks are up, you’re ready to hang your garland. For this, follow these steps:
- Start at one end of the cabinets. From there, drape the garland over the first hook. Also, pull the garland taut as you take it to the next hook. Then, you can hang it to the second hook.
- You must continue this way to hang the entire garland on all the hooks securely. Double-check for proper hanging of the garland on the hooks over the cabinets.
For the best results, the garland mustn’t sag between hooks. You can tighten the garland by sliding the hooks along the wall studs.
Style and Fluff Garland for a Full, Festive Look
Once you have hung the garland, don’t stop. It’s time to make it look full and festive. Fluffing and styling the garland will give it a lush, decorative look that spreads holiday cheer.
Add Filler
You may use additional greenery, berries, ornaments or ribbon. With them, you can fill in sparse areas of the garland. It will create a fuller look.
- Tuck the filler into the garland
- Secure it with floral wire, twist ties or hot glue.
The filler will make the garland look more abundant and help it stand out.
Style with Ribbon
Ribbon is an easy way to dress up a garland and make it eye-catching. You can loop a ribbon around the garland. The loop will create bows or knots for a unique appearance. Also, let the ribbon trail from the garland if you want a whimsical accent.
Moreover, the wired ribbon holds its shape well for garland. For the ribbons, you can choose a contrasting or complementary color to the garland. It will yield the most impact in the kitchen and on top of the cabinet.
Add Accent Pieces
You can place a few special ornaments, berries, cones or other accents along the garland.
- You can cluster them together on one part of the garland
- Alternatively, space them evenly for subtle pops of color.
On top of that, you can choose different accent pieces such as Christian wall art. These decorative pieces will provide visual interest to highlight the garland.
With some shaping, filling, ribbon and accents, your simple garland will become a showstopping decoration above the kitchen cabinet.
Different Decorative Techniques for Garland Above Cabinets
You can be creative in draping and hanging the garland above the cabinet. The key is to add a festive touch with your best draping style.
- You may drape your garland in a zigzag pattern. Start at one end of the cabinets and work your way across. You must pin the garland at an angle using decorative hooks. The Zigzag style is perfect for more casual kitchens.
- For an elegant twist, wrap the garland in a spiral shape. You can arrange the garland in a circular motion with each loop. The spiral shape works well for most cabinets.
- Crisscrossing the garland for an “X” shape is appreciable, too. Start at opposite corners of the cabinets and arrange the garland at an angle to form an “X” in the center.
- Do you prefer a casual and effortless style for the cabinet? If so, you should drape the garland loosely over the top of the cabinets. Then, let the ends hang down on each side. The natural drape allows the garland to flow freely for a carefree feel.
Safety Tips For Hanging Garland Above Cabinets
Safety should be a top priority when hanging a garland above your kitchen cabinets. Or else you can get injured or damage the cabinet.
- Ensure both ends of your garland are securely fastened so it does not fall. You can attach the ends to studs in the wall, hooks screwed into the ceiling, or sturdy cabinet hardware.
- Will you use multiple strands of garland together or attach other decorations? Then, you must double-check that all connections are secure before leaving the area.
- There are pre-lit garlands, too, for cabinet decorations. For them, be sure to unplug the lights when you are not using them or when you leave the house.
- Do not place lit candles or other open flames near paper, fabric or pre-lit garland. Or the flame can burn the garland to ruin the entire cabinet.
- Lastly, use a ladder to climb over the cabinet safely. Also, you should put less weight on the cabinet top, especially if it is glass.
Conclusion:
A garland on the kitchen cabinet isn’t about decoration and festival only. It brings a charming vibe to the cooking space and elevates your mood. As you follow our guidelines on how to hang garland above kitchen cabinets, the task should be a brisk one.
For a fun holiday, you can complete the DIY garland hanging task with your family and kid. It will also improve the interest of kids in DIY decorative works. However, switch off the electrical connections near the cabinet to avoid accidents. Also, you may choose different styles and draping methods for the garland to ensure it looks immaculate.
Leave a Reply