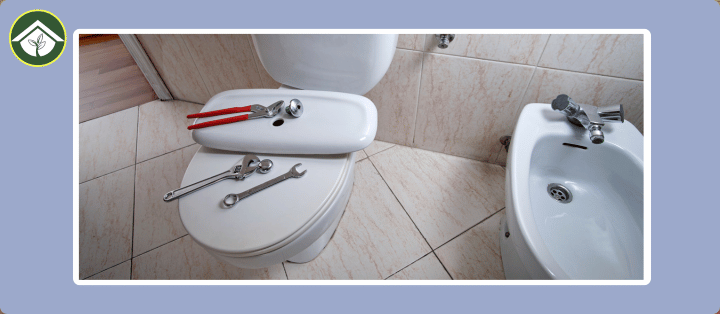
A loose, wobbly toilet seat is one of those household annoyances that seems minor until you’re actually dealing with it. That unsettling sideways shift every time you sit down is not only uncomfortable — it is also a genuine safety risk, particularly for children and the elderly. The good news is that knowing how to tighten a toilet seat is one of the simplest DIY repairs a homeowner can carry out, requiring little more than a screwdriver, a wrench, and about fifteen minutes of your time. Whether you are dealing with a top-mount or bottom-mount fitting, plastic or metal bolts, or a seat that keeps coming loose no matter what you do, this guide walks you through every method, fix, and preventive measure you need. Say goodbye to the wobble for good.
Why a Loose Toilet Seat Is a Problem You Should Not Ignore:
It is tempting to live with a slightly wobbly seat, but ignoring it can make things significantly worse over time. A shifting seat creates repeated micro-stress on the mounting bolts and — critically — on the porcelain of the toilet bowl itself. Over time, this can cause hairline cracks in the ceramic. Beyond structural damage, gaps that open up around loose hinges trap moisture, grime, and bacteria, making the toilet harder to keep hygienic. According to guidance from the NHS on bathroom hygiene, reducing bacterial harborage points in the bathroom is an important part of household hygiene practice.
From a safety standpoint, an unstable seat can cause unexpected slipping or falls — a concern highlighted repeatedly by home safety organisations when addressing bathroom hazards for older adults. Fixing it promptly is always the right call.
Tools You Will Need Before You Start:
Gathering your tools before you begin saves time and frustration. Most toilet seat repairs require only common household items:
- Flathead or Phillips-head screwdriver — used to tighten or remove the mounting bolts on the top of the seat
- Adjustable wrench or ratchet wrench with a deep socket — for reaching and tightening nuts underneath the toilet bowl
- Needle-nose pliers — helpful for gripping small nuts in tight spaces
- Rubber gloves — always wear these; even a visually clean toilet carries germs and cleaning chemicals
- Toilet seat tightening kit (optional) — available at hardware stores for under £10/$10, these include replacement bolts, rubber washers, and a specialty tightening tool
- Replacement bolts and nuts — in case the original hardware is corroded or stripped
Understanding Your Toilet Seat Fixing Type — The Critical First Step:
Before you reach for a screwdriver, you need to identify which type of fixing your toilet uses. There are two primary systems, and the approach differs for each.
Bottom-Fix (Traditional) Fittings:
The older, more traditional style. Bolts pass through holes at the back of the toilet pan from above and are then secured with wing nuts or standard nuts tightened from underneath the bowl. To check if your toilet has this type, reach behind the toilet bowl toward the back — if you can feel a bolt protruding underneath, you have a bottom-fix system. These are straightforward to work with because the nuts are accessible.
Top-Fix (Modern) Fittings:
Most contemporary and one-piece toilets use this system. The bolts feed down into the pan and tighten entirely from above, usually via a bolt concealed beneath a snap-open plastic or chrome cap. There is nothing to grip underneath the bowl. This design is popular because it is easier to install, easier to clean around, and works with back-to-wall and skirted bowl designs where there is no underside access. According to Victorian Plumbing’s toilet seat buying guide, top-fixing hinges are now standard on the majority of modern toilet designs precisely because of this accessibility advantage.
How to Tighten a Toilet Seat — Step-by-Step Methods:
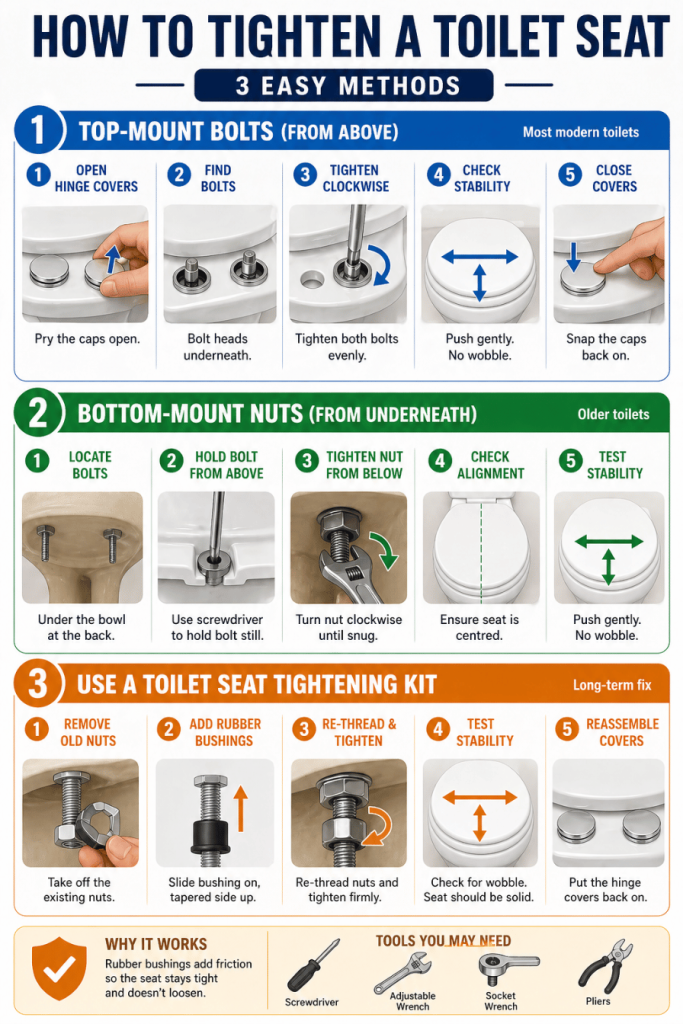
Method 1 — Tightening Top-Mount Bolt Screws From Above:
This is the quickest fix for most modern toilets with hidden top-fix fittings.
- Locate the hinge covers. At the back of the seat, near where it connects to the bowl, you will see two small plastic or chrome caps. Pry these open gently using your fingers or a flathead screwdriver — do not force them or they may snap.
- Expose the bolts. Beneath each cap you will find a bolt head, usually with a flat or Phillips slot.
- Tighten clockwise. Insert your screwdriver and turn each bolt clockwise. Work on both bolts evenly — tighten the left a little, then the right, alternating until both are snug. This keeps the seat balanced and centred on the bowl.
- Test for stability. Give the seat a firm push side-to-side and front-to-back. There should be no movement.
- Replace the caps. Snap the hinge covers back down until you hear a click. This protects the hardware from moisture and keeps the toilet looking clean.
Method 2 — Tightening Bottom-Mount Nuts From Underneath:
For older toilets where you have access to nuts below the bowl.
- Locate the bolts. These are visible on the underside of the toilet bowl at the rear, near the tank.
- Hold the bolt steady from above. Use your screwdriver in the bolt head slot on top while you work underneath. This stops the bolt spinning freely.
- Tighten the nut from below. Use an adjustable wrench, ratchet wrench with a deep socket, or needle-nose pliers to turn the nut clockwise until snug. If it is a wing nut, you may be able to tighten it by hand first, then use pliers for the final quarter-turn.
- Check alignment. Before fully tightening, confirm the seat is centred correctly over the bowl. Once tight, re-check for wobble.
Method 3 — Using a Toilet Seat Tightening Kit (The Long-Term Fix):
If your seat keeps coming loose after a few days or weeks, the underlying hardware is almost certainly worn out. This is where a tightening kit proves its value.
As Family Handyman explains, simply replacing plastic bolts with new hardware and adding rubber bushings is a more permanent solution than endlessly re-tightening the same worn bolts. The rubber washers compress slightly under the nut, creating friction that prevents the seat from vibrating loose through regular use.
- Remove the existing nuts from the bolts completely.
- Slide a rubber bushing onto each bolt from underneath, tapered side facing up toward the seat.
- Re-thread the nuts and use the specialty tool from the kit (or a deep-socket wrench) to snug them up firmly.
- Give the seat a full stability test before reassembling the hinge caps.
How to Stop a Toilet Seat from Moving — Preventive Measures:
Fixing the wobble is step one. Stopping it from coming back is step two.
Install Seat Stabilisers:
Seat stabilisers are small rubber or plastic grips that attach to the underside of the seat, pressing against the sides of the toilet bowl. They cost very little and dramatically reduce lateral movement. Less lateral wobble means the mounting bolts experience less vibration stress — so they stay tight for longer.
Switch to a Slow-Close Seat:
One of the most common causes of loosening bolts over time is the repeated impact of a seat being let fall. Each slam sends a shockwave through the hinge hardware. A soft-close (slow-close) toilet seat eliminates this entirely. The hydraulic mechanism controls the lid’s descent, preventing it from banging shut.
Perform Regular Maintenance Checks:
Every few months, lift the hinge caps and give the bolts a quarter-turn check. This takes less than two minutes and catches any loosening before it becomes a wobble you notice every day.
When to Replace Rather Than Repair Your Toilet Seat:
Sometimes tightening is not enough. If the seat material is visibly cracked, if the hinge brackets are broken, or if the bolt holes in the porcelain are chipped or enlarged, replacement is the better choice. Toilet seats typically last between five and ten years, depending on material and frequency of use. If your seat is discoloured, structurally compromised, or the plastic has become brittle, replacing it is safer and more hygienic than continued repairs.
For guidance on safe disposal and recycling of bathroom fixtures, the UK Government’s waste disposal guidance provides direction on handling household waste responsibly.
One Critical Warning — Do Not Over-Tighten:
This is the most important caution in this entire guide. Tightening the bolts too hard is a genuine risk. Porcelain, though hard, is brittle — excessive torque on a mounting bolt can crack the toilet bowl, turning a simple fifteen-minute fix into a full toilet replacement job. Equally, over-tightening plastic or nylon nuts strips their threads, meaning they will never hold securely again. The correct approach: tighten until the seat stops wobbling, then add one final quarter-turn. That is all that is needed.
Frequently Asked Questions
Why does my toilet seat keep coming loose after I tighten it?
This usually means the hardware itself is worn out. Plastic bolts and nuts degrade over time, and once the threads begin to strip or the washers flatten, they cannot maintain consistent tension. The solution is to replace the bolt hardware entirely — ideally with stainless steel or nylon-lock nuts — and add rubber bushings between the nut and the porcelain to absorb vibration. Simply re-tightening old, damaged hardware is a temporary fix at best.
What tools do I need to tighten toilet seat bolts?
For most standard toilet seats, a flathead or Phillips screwdriver is all you need if your toilet has top-fix fittings. For bottom-fix toilets where you need to access the underside, an adjustable wrench, ratchet wrench with a deep socket, or needle-nose pliers will be necessary. Rubber gloves are always recommended for hygiene.
How do I tighten toilet seat bolts I cannot reach underneath?
If your toilet has a skirted or back-to-wall design with no underside access, you almost certainly have top-fix fittings. Look for small plastic or chrome snap caps at the rear of the seat near the hinges — pry these open to reveal bolt heads you can tighten from above using a screwdriver. No underside access is required at all.
How do I fix a wobbly toilet seat that has no visible screws?
Modern concealed-fixing toilets hide all hardware beneath decorative snap caps. Use a flathead screwdriver or your fingernails to gently lift these caps at the rear of the hinge area. The bolt slots will be directly beneath. Tighten clockwise with the appropriate screwdriver, replace the caps, and the wobble should be eliminated.
What is the standard size for toilet seat bolts?
According to Angi’s plumbing guides, the standard size for toilet seat mounting bolts is 2¼ inches, with corresponding nuts at 3/8 inch. However, some toilet brands — notably certain Kohler models — use non-standard hole sizes and proprietary anchor nuts, so always check your toilet’s product documentation or measure your existing hardware before purchasing replacements.
How do I stop a toilet seat from sliding sideways?
Lateral sliding is usually caused by worn or absent rubber pads at the underside of the seat front. These pads grip the porcelain rim and prevent side-to-side movement. You can purchase adhesive rubber bumpers from any hardware store and stick them to the underside of the seat. Installing seat stabiliser strips on the inner sides of the bowl offers an even more permanent solution.
Can I tighten a toilet seat without a wrench?
Yes, in many cases. If your toilet uses wing nuts underneath, these can often be hand-tightened, then given a final snug turn using pliers or even a sturdy butter knife slipped under the wing. For top-fix designs, a standard screwdriver is all that is needed — no wrench required at all. If the nut beneath is a standard hex nut, you will need a wrench or adjustable pliers for proper torque.
Is it safe to over-tighten toilet seat bolts?
No — over-tightening is one of the most common mistakes made during this repair. Porcelain is brittle and can crack under excessive bolt pressure, and plastic nuts can have their threads stripped beyond use. The correct torque is snug plus a final quarter-turn only. If the seat no longer wobbles, stop tightening.
How do I adjust toilet seat screws that keep spinning without tightening?
A spinning bolt that won’t tighten usually means the nut on the underside is also spinning freely. You need to hold the nut in place using pliers or a wrench from below while simultaneously turning the bolt from above with a screwdriver. This two-handed technique stabilises both ends of the fastener and allows proper tightening.
How long does a toilet seat typically last before needing replacement?
Most toilet seats last between five and ten years under normal household use, though quality and usage frequency both affect this considerably. Padded vinyl seats tend to degrade faster than solid plastic or thermoset seats. Signs that replacement is due include visible cracking, broken hinge arms, permanent discolouration, or bolt holes that have become enlarged through repeated tightening.
Can a loose toilet seat damage the toilet bowl?
Yes, over time. The constant micro-movement of a loose seat creates friction stress at the mounting points. This can chip or crack the porcelain around the bolt holes, and in severe cases cause larger cracks in the bowl itself. Catching and fixing a loose seat early prevents this kind of progressive damage.
What is a toilet seat tightening kit and where can I buy one?
A toilet seat tightening kit typically includes replacement bolts, nuts, rubber washers or bushings, and a small specialty tightening tool designed to fit most standard mounting nuts. These kits are available at hardware stores, DIY retailers such as B&Q or Home Depot, and online. They generally cost less than £10/$10 and provide a far more durable solution than simply re-tightening worn original hardware.
Should I call a plumber to fix a loose toilet seat?
In almost all cases, this is not necessary. Tightening or replacing toilet seat hardware is a straightforward DIY task requiring no specialist knowledge or plumbing skills. However, if you discover a crack in the porcelain bowl, a leak around the base of the toilet, or significant damage to the mounting area, a plumber’s assessment is worthwhile. The Consumer Federation of America’s home maintenance guidance recommends learning which basic repairs are safely DIY and which require professional intervention — and toilet seat tightening sits firmly in the DIY category for most households.
How do I tighten a soft-close toilet seat that has become loose?
Soft-close seats use hydraulic or dampened hinge mechanisms, but the mounting hardware is generally the same as on a standard seat. Locate the hinge caps, pry them open, and tighten the bolts in the same way. Some soft-close seats feature a quick-release button or lever on the hinge that allows the seat to detach completely for cleaning — make sure the seat is properly clicked back into its mounting before diagnosing a wobble problem, as an unclicked quick-release seat will always feel loose.
What should I do if the bolt hole in my toilet bowl is damaged or enlarged?
If the mounting hole in the porcelain has been worn or cracked to the point that a standard bolt cannot grip it, you have a few options. Expanding rubber bolt anchors — available in toilet repair kits — expand inside the hole when the bolt is tightened, gripping the damaged porcelain more effectively than a standard bolt. If the damage is severe or the porcelain is cracked, the bowl may need professional assessment or replacement.
For further reading on general home plumbing maintenance, the WikiHow plumbing maintenance library and the This Old House DIY guides offer comprehensive, reliable references for homeowners tackling bathroom repairs.


Leave a Reply