The slope on the bathroom floor is essential for proper drainage. If the bathroom floor and tiles are laid flat without any sloping, the water won’t pass to the drain hole. Thus, it will accumulate over the entire bathroom floor, keep it wet for long hours and cause damage. People say improper sloping on the bathroom floor drains money, not water.
It is true because inappropriate sloping will hurt the flooring and tiles. Hence, you must know how to correct the slope in the bathroom. Also, you must understand the top mistakes to avoid during the floor sloping. It will help you relieve from costlier repairing jobs.
Typically, homeowners don’t measure the slope of their bathroom floor correctly. It results in improper sloping. Plus, they forget to run a flood test, which also results in poor drainage. To fix this, you must remove the tiles and restructure the floor tiling.
Top Mistakes For Bathroom Floor Sloping:
Bathroom floor slopes are important for multiple reasons. Without the proper slopes, you will see water consumption in different places on the floor. It won’t move and get stagnant without drainage. Also, it makes the floor slippery. As a result, you are prone to injuries.
So, why do slopes in the bathroom go wrong? Here’s the answer:
Don’t consider slopping is necessary:
Many people think that slopping on the bathroom floor is unnecessary. Many people consider that the bathroom floor can be level. Yes, they think that grouts and tiles will make the bathroom waterproof. Unfortunately, it is not correct. The water won’t get away from the floors without the right slopes.
Improper measurement for the slopes:
Even if homeowners consider the slopes necessary, they fail to measure the angle of the slope. On average, a bathroom floor must have ¼” of slopes for each foot. If the angle is more or less, you will not see water rolling through it.
Not running a flood test:
A flood test in the bathroom suggests you fill the floor with water and see what happens. If the slope is done correctly, the entire water should quickly run off to the draining hole. Drying the floor with proper sloping will take less than 30 minutes.
However, most people forget it, so the sloping becomes faulty.
Breaching the waterproof zone:
You have to maintain a suitable waterproof membrane and zone in the bathroom. Sometimes, we forget about this waterproof zone while tiling the floor. So, we damaged the zone and finished the tiling with improper sloping.
The solution is to protect the waterproof membrane and zone while tiling on the floor. Or else all of your work will ruin. Also, in the basement, inappropriate waterproofing will flood the yard of your home.
Selecting inappropriate tiles:
You must select the right tiles for your bathroom floor. Bathroom tiles must be non-slippery and sloppy to help remove the water properly. So, when you buy tiles for the bathroom, you need to be careful.
How To Correct Slope In Bathroom Floor?
We have discussed the mistakes you make while using bathroom flooring resulting in inappropriate slopes. So, how to fix it?
You must remove the tiles, redo the slopes, and arrange the tiles and grouts properly to get proper slopes in your bathroom. Otherwise, water will continue accumulating over the floor to damage it.
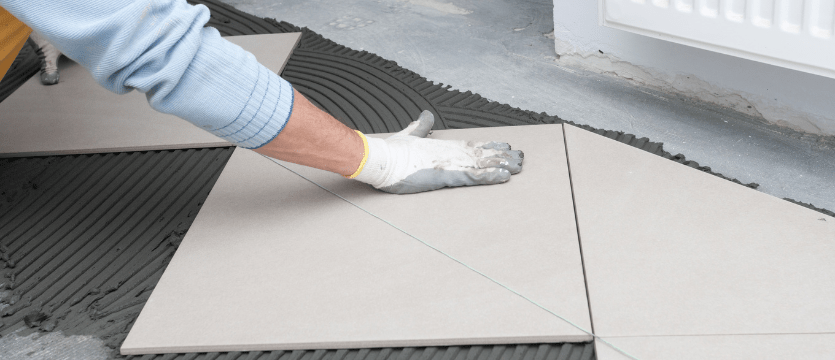
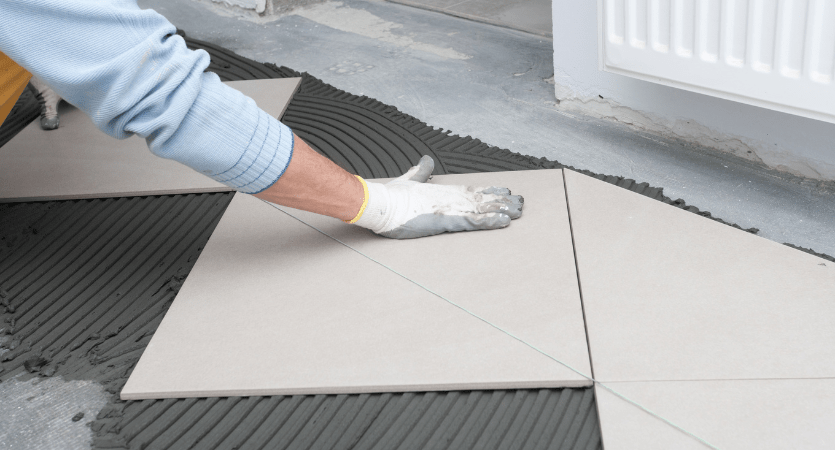
Step 1: Remove the floor tiles:
First, you must remove the tiles from the bathroom floor. You can use a chisel to work carefully with the tiles. It is a challenging job because it runs the risk of damaging a few tiles. Thus, you should try finding similar tiles before correcting the slopes.
As you remove the tiles, ensure that you don’t hurt the shower base. If you have a bathtub, you must work carefully for the tiles around it. Once you have removed the tiles, pour water on them. It will dampen and soften the tiles. It is helpful to redo them.
Step 2: Check for the wet beds:
Modern-day homes use wet beds to make the uneven surface even. It is necessary to protect the floor and tiles from damage due to uneven spots. Also, with uneven space, the floor can’t be adequately constructed.
You need to remove the wet beds, too, for proper sloping. It is made with sand and cement, so it should be easy for you. Also, without wet beds the risk of chlorine gas accumulation increases.
Step 3: Measure and correct the slopes:
You must measure the slope level when you have removed the wet bed and are working with the bed on your floor. You will find leveling tools in a hardware store or on Amazon for this measurement. Or, you may use string and stake to measure the distance correctly.
- Place a stake or scale with distance measurements in it at one point on the bathroom floor.
- Tie a string with the scale at a height. It helps you slowly create a slope with the string.
- At a distance, lower the string and put a second stake there. Ensure that the 2nd stake is lower than the 1st stake.
- Follow the same process for each foot on the bathroom floor. Technically, the floor should be ¼” sloppy for every foot.
- When finished, use a leveling to judge the accuracy of the sloping. As you move the level from the 1st to the last stake, you will see the level. You can proceed to the next step if the slope is done correctly.
And if you see a miscalculation, you need to fix the faulty slopes again.
Step 4: Redo the base floor:
Now, you need to redo the floor base using concrete and cement. As you reconstruct the floor, maintain the right slope and angle calculated with the level. Keep the stake and string for the correct calculation and flooring.
Step 5: Redo the tiles and grouts:
Allow the floor to dry properly before you work with the tiles. It will take approximately 48 to 72 hours to dry the floor. After that, you can use white cement and putty to retile the floor. Apply the cement on the dried floor first.
Then, apply the tile on it with firm pressure. You must ensure that the tile is stuck with the cement before drying up quickly. Also, ensure that you are maintaining the slopes correctly.
Step 6: Apply adhesives and grouts:
You need to use grout and adhesive to reinforce the tiles. Look closely between the connecting point of two tiles. You have to make the joint waterproof by applying bathroom adhesive and grout. Or else the water will run through these joints directly to the base flooring without a proper waterproofing facility.
It will ruin the entire flooring and damage your bathroom.
Step 7: Run a flood test:
Once the tiles are set and have dried up, you should run a flood test in the bathroom. For this, turn on the bathroom faucet and fill the floor. Now, see if the water runs to the draining point following the slopes. If you have calculated the slopes and maintained them during the tiling, the water will run appropriately to the draining hole.
Conclusion:
When you have misplaced sloping in the bathroom floor, it can be costly. Even if you follow this process on how to correct slopes on the bathroom floor, it won’t be a great DIY project. We suggest you call for professional help since any mistake might be even costlier. As you follow our process to rectify the bathroom floor slopes, ensure you have a few leftover tiles. It will be handy if you break or damage any tiles.
Leave a Reply