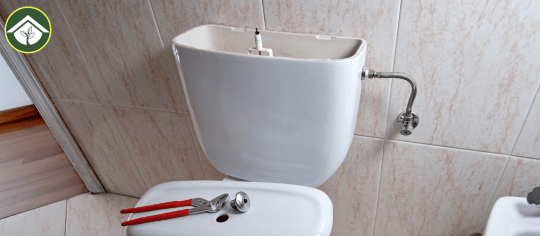
Every day, the average person flushes a toilet around six to eight times. That’s thousands of flushes per year — and yet most people have no idea what’s happening inside that rectangular porcelain box sitting behind the bowl. The toilet tank is one of the most cleverly engineered components in your home. It stores water, controls flow, prevents overflows, seals itself automatically, and resets for the next flush — all using gravity, rubber, and a handful of simple mechanical parts with no electricity required.
Understanding your toilet tank isn’t just trivia. It is the foundation for smart DIY repairs, smarter purchasing decisions, and catching problems before a small drip becomes a flood or a slow leak wastes thousands of gallons of water annually. Whether you’re researching toilet tank replacement parts, trying to fix a running toilet, or just curious about what’s going on inside that tank, this complete guide covers every part, every function, and every connection you need to know.
What Is a Toilet Tank and Why Does It Matter?:
The toilet tank — also called the cistern or water closet tank — is the enclosed, usually rectangular reservoir mounted at the back of the toilet bowl. Its primary job is to store a measured quantity of water and release it rapidly when you flush, creating the force needed to carry waste through the trapway and into the sewer or septic system.
A standard residential toilet tank holds between 1.28 and 1.6 gallons of water under current U.S. federal water efficiency standards set by the Environmental Protection Agency’s WaterSense program. Older pre-1994 toilets used 3.5 to 7 gallons per flush — a dramatic difference that reflects decades of plumbing code evolution.
The tank matters because it is the mechanical heart of the entire flushing system. Every toilet problem — a running toilet, weak flush, incomplete refill, leaking base, or sweating exterior — traces back to one or more components inside or connected to the tank. Knowing those components by name and function turns a confusing plumbing problem into a straightforward diagnostic process.
The Outer Structure of a Toilet Tank: What You See From the Outside:
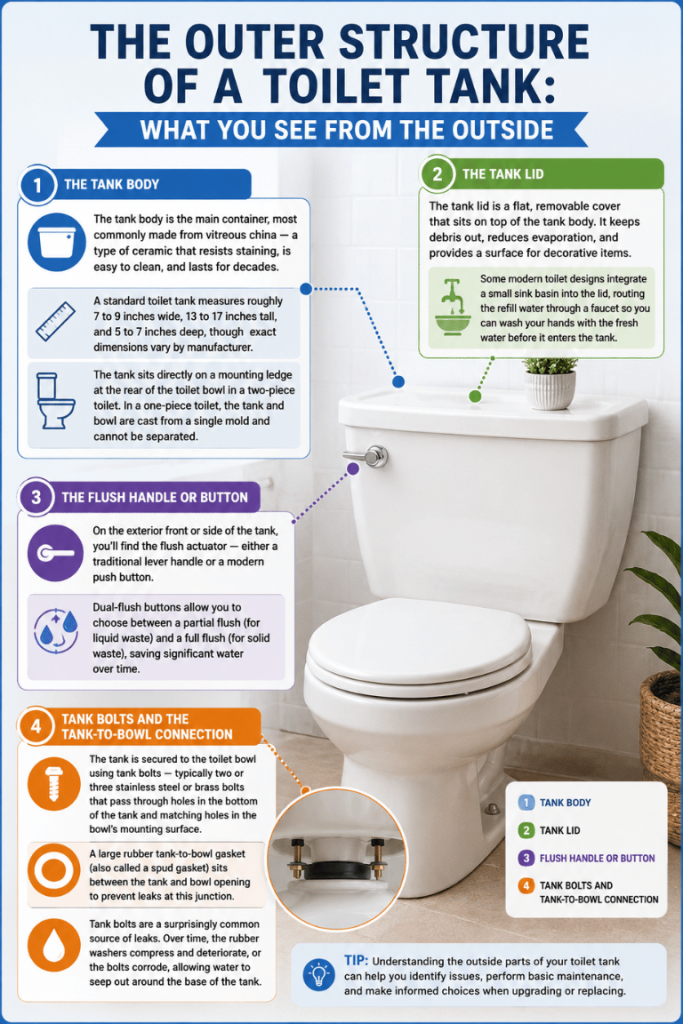
Before opening the lid, it helps to understand the tank’s physical structure and how it connects to the rest of the toilet.
The Tank Body:
The tank body is the main container, most commonly made from vitreous china — a type of ceramic that is fired at extremely high temperatures to create a non-porous, glassy surface. This material resists staining, is easy to clean, and lasts for decades. Some manufacturers use high-impact ABS plastic or composite materials, particularly for pressure-assist toilets or compact designs where weight reduction matters.
A standard toilet tank measures roughly 7 to 9 inches wide, 13 to 17 inches tall, and 5 to 7 inches deep, though exact dimensions vary by manufacturer and toilet model. The tank sits directly on a mounting ledge at the rear of the toilet bowl in a two-piece toilet. In a one-piece toilet, the tank and bowl are cast from a single mold and cannot be separated.
The Tank Lid:
The tank lid is a flat, removable cover that sits on top of the tank body. It is not attached with fasteners in most standard designs — it simply rests by gravity. The lid serves a few important functions: it keeps debris out of the tank, reduces evaporation, and provides a surface for decorative items. Always lift the lid carefully; it is made of the same vitreous china as the tank body and will shatter if dropped.
Some modern toilet designs integrate a small sink basin into the lid, routing the refill water through a faucet so you can wash your hands with the fresh water before it enters the tank — a space-saving and water-conserving design popularized in Japan.
The Flush Handle or Button:
On the exterior front or side of the tank, you’ll find the flush actuator — either a traditional lever handle or a modern push button. The flush handle is connected to a lift arm inside the tank, which in turn connects to the flapper chain. When you press or pull the handle, this chain of mechanical connections triggers the entire flush cycle.
Dual-flush buttons, increasingly common in modern toilets, allow you to choose between a partial flush (for liquid waste) and a full flush (for solid waste), saving significant water over time.
Tank Bolts and the Tank-to-Bowl Connection:
The tank is secured to the toilet bowl using tank bolts — typically two or three stainless steel or brass bolts that pass through holes in the bottom of the tank and matching holes in the bowl’s mounting surface. Rubber washers and nuts on the underside create a watertight, stable connection. A large rubber tank-to-bowl gasket (also called a spud gasket) sits between the tank and bowl opening to prevent leaks at this junction.
Tank bolts are a surprisingly common source of leaks. Over time, the rubber washers compress and deteriorate, or the bolts corrode, allowing water to seep out around the base of the tank.
Every Part Inside a Toilet Tank Explained:
Open the tank lid and you’ll find a surprisingly organized collection of components, each with a specific mechanical role. Here is a complete breakdown.
The Fill Valve (Ballcock):
The fill valve — historically called a ballcock — is the tall, cylindrical assembly mounted on the left side of the tank interior (in most standard installations). Its job is to control the flow of fresh water into the tank from the household water supply line, refilling the tank after each flush.
The fill valve connects at the bottom of the tank to the water supply line via a threaded tailpiece and locknut. At the top, it connects to the refill tube. Modern fill valves are almost universally the float-cup design, where a small plastic cup rides up and down the valve body as water level changes. When water rises to the preset level, the float cup mechanically shuts off the valve. Older toilets used a ball float design — a rubber or plastic ball on a metal arm — which operated on the same principle but is now largely obsolete.
The fill valve is adjustable. Most modern designs allow you to slide the float cup up or down the valve shaft to raise or lower the water level in the tank. The correct water level is typically 1 inch below the top of the overflow tube.
According to the International Association of Plumbing and Mechanical Officials (IAPMO), fill valves must meet specific anti-siphon requirements to prevent contaminated water from being drawn back into the drinking water supply — a critical public health protection built directly into the design.
The Float:
The float is the buoyant device that rises and falls with the water level and signals the fill valve to open or close. In modern float-cup fill valves, the float is an integrated part of the assembly. In older ballcock designs, the float was a separate brass or plastic ball attached to a horizontal float arm.
When the float rises to the correct water level, it mechanically closes the fill valve inlet, stopping water flow. If the float is set too high, the tank overfills and water runs continuously into the overflow tube. If set too low, there isn’t enough water for a complete flush.
The Overflow Tube:
The overflow tube is a vertical standpipe — usually an integral part of the flush valve assembly — that acts as the tank’s last line of defense against overflow. If the fill valve fails to shut off and water continues rising, excess water flows down the inside of the overflow tube and into the toilet bowl, preventing it from spilling over the tank rim onto your floor.
The correct water level in the tank should sit approximately 1 inch below the top of the overflow tube. The height of the tube effectively sets the maximum water level. If you notice your toilet running constantly, the water may be spilling into the overflow tube — visible by looking inside the tank and seeing whether water is at or above the tube’s opening.
The overflow tube also plays a secondary role: the refill tube clips onto the top of it, directing a small stream of water into the bowl during refilling (see below).
The Flush Valve:
The flush valve is the assembly at the center-bottom of the tank through which water exits the tank into the bowl during a flush. It consists of a large opening (the flush valve seat), a vertical overflow tube, and the mechanism that holds the flapper in place.
Standard flush valves have a 2-inch diameter opening. High-performance toilets use 3-inch flush valves, which empty the tank approximately 30% faster, producing a more powerful flush. The flush valve seat is the flat, smooth ring on which the flapper rests to form a watertight seal. Over time, mineral deposits and deterioration can roughen this seat, causing the flapper to leak even when it appears intact.
The Flapper:
The flapper is arguably the most important — and most frequently replaced — component inside a toilet tank. It is a flexible rubber or silicone disc that sits over the flush valve opening, creating a watertight seal that holds water in the tank between flushes.
When you press the flush handle, the lift chain pulls the flapper upward, breaking the seal and allowing water to rush from the tank into the bowl. Once the tank empties sufficiently, the flapper falls back onto the flush valve seat by gravity, resealing it so the tank can refill.
Flappers deteriorate over time from exposure to chlorine, hard water minerals, and cleaning chemicals. A worn flapper is responsible for the vast majority of running toilet complaints — the U.S. Geological Survey’s water resources data estimates that a leaking toilet flapper can waste 200 or more gallons of water per day. Flappers typically last 4 to 5 years and cost just a few dollars to replace.
The Lift Chain:
The lift chain (or flapper chain) is a small metal chain that connects the flapper to the flush handle’s lift arm inside the tank. When the handle is pressed, the lift arm rises, pulling the chain and lifting the flapper off the valve seat.
Proper chain length is important. There should be about ½ inch of slack in the chain. Too much slack and the flapper won’t lift fully, causing a weak or incomplete flush. Too little slack and the chain may prevent the flapper from reseating fully, causing a continuous running sound.
The Flush Handle and Lift Arm:
Inside the tank, the flush handle connects to a lift arm (also called the trip lever) — a metal or plastic rod that runs horizontally inside the tank. The handle passes through the tank wall via a mounting nut. The lift arm is attached to the flapper chain. In side-mount configurations, the arm runs left or right; in front-mount designs, it angles forward.
Handles come in a wide range of finishes — chrome, brushed nickel, oil-rubbed bronze — and can be replaced independently of any other tank components if they break or corrode.
The Refill Tube:
The refill tube is a small, flexible plastic tube that runs from the fill valve to the top of the overflow tube. Its job is separate from refilling the tank: it directs a small, steady stream of water down the overflow tube and into the toilet bowl during each refill cycle. This replenishes the water level in the bowl itself, maintaining the water seal in the trapway that blocks sewer gases from entering the bathroom.
Without a functioning refill tube, the bowl would have too little water after each flush, which can allow sewer gas (hydrogen sulfide and methane) to seep through the drain trap.
The Tank-to-Bowl Gasket (Spud Gasket):
The large, donut-shaped rubber gasket that sits between the bottom of the tank and the top of the bowl’s inlet opening is called the tank-to-bowl gasket or spud gasket. It creates a watertight seal so that water flows directly from the tank into the bowl without leaking around the junction.
This gasket can harden, crack, or compress over years of use, leading to slow leaks at the base of the tank. Replacing it requires removing the tank from the bowl — a moderately involved but entirely DIY-able repair.
The Water Supply Line and Shut-Off Valve:
While technically outside the tank body, the water supply line is the flexible tube (usually braided stainless steel or vinyl) that runs from the wall shut-off valve to the fill valve’s tailpiece at the bottom of the tank.
The shut-off valve (also called the stop valve or angle stop) is the small valve on the wall behind the toilet. It controls water flow to the toilet entirely. Before any toilet tank repair, turning off this valve is the first step. Supply lines can corrode or develop slow leaks, particularly at their threaded connections, so they should be inspected annually.
How a Toilet Tank Works: The Complete Flush Cycle Step by Step:
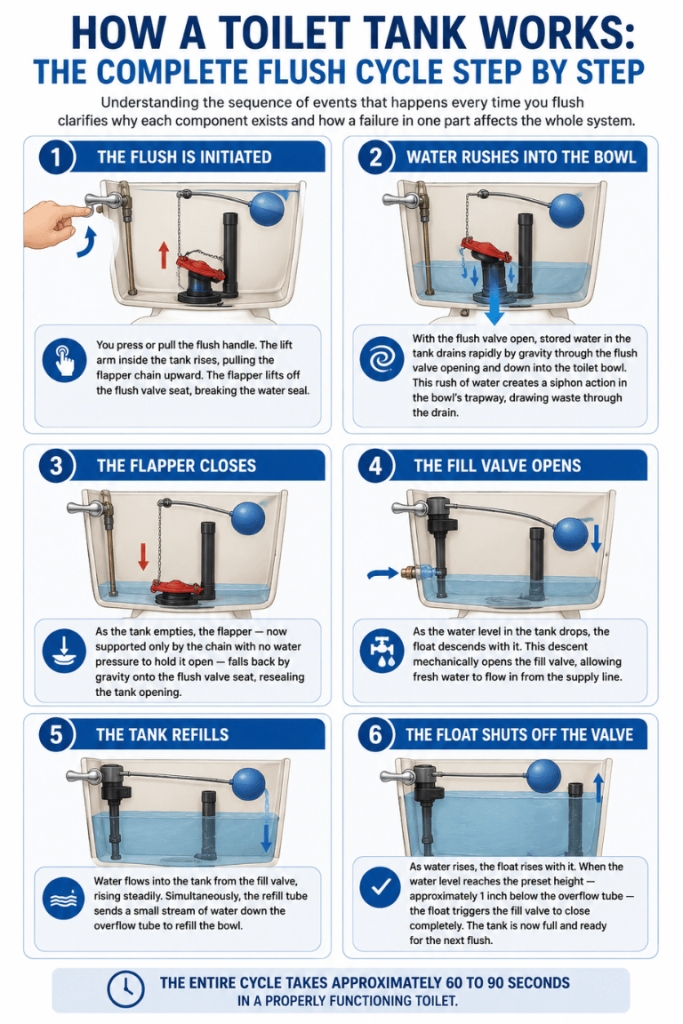
Understanding the sequence of events that happens every time you flush clarifies why each component exists and how a failure in one part affects the whole system.
Step 1 — The Flush Is Initiated:
You press or pull the flush handle. The lift arm inside the tank rises, pulling the flapper chain upward. The flapper lifts off the flush valve seat, breaking the water seal.
Step 2 — Water Rushes Into the Bowl:
With the flush valve open, stored water in the tank drains rapidly by gravity through the flush valve opening and down into the toilet bowl. This rush of water creates a siphon action in the bowl’s trapway, drawing waste through the drain.
Step 3 — The Flapper Closes:
As the tank empties, the flapper — now supported only by the chain with no water pressure to hold it open — falls back by gravity onto the flush valve seat, resealing the tank opening.
Step 4 — The Fill Valve Opens:
As the water level in the tank drops, the float descends with it. This descent mechanically opens the fill valve, allowing fresh water to flow in from the supply line.
Step 5 — The Tank Refills:
Water flows into the tank from the fill valve, rising steadily. Simultaneously, the refill tube sends a small stream of water down the overflow tube to refill the bowl.
Step 6 — The Float Shuts Off the Valve:
As water rises, the float rises with it. When the water level reaches the preset height — approximately 1 inch below the overflow tube — the float triggers the fill valve to close completely. The tank is now full and ready for the next flush.
The entire cycle takes approximately 60 to 90 seconds in a properly functioning toilet.
Types of Toilet Tanks by Design and Flushing Technology:
Not all toilet tanks operate identically. Different design philosophies and technologies produce different types.
Gravity-Fed Tanks:
The standard residential toilet tank uses gravity — the weight of stored water released rapidly through the flush valve. This is the most common design globally, representing the overwhelming majority of residential installations.
Pressure-Assist Tanks:
Pressure-assist toilets use a sealed pressure vessel inside the tank that stores compressed air. When flushed, the pressurized air forces water into the bowl much faster than gravity alone, producing a powerful flush using less water. These are common in commercial buildings and recommended for households with frequent clogs. They are louder than gravity toilets and cost more to repair.
Dual-Flush Tanks:
Dual-flush toilets offer two flush volumes: a smaller partial flush (typically 0.8 to 1.0 gallons) for liquid waste and a full flush (1.28 to 1.6 gallons) for solid waste. The WaterSense certification program recognizes dual-flush toilets as a significant water conservation measure.
Wall-Hung Tanks (High-Tank Toilets):
Older and some heritage-style toilets use a tank mounted high on the wall, connected to the bowl by a flush pipe. The extra height creates greater water pressure and flush force through gravity alone. These are rare in modern construction but still encountered in older homes.
Tankless Toilets:
Tankless or flushometer toilets use direct water pressure from the supply line rather than a stored reservoir. Common in commercial restrooms, they require higher water pressure than most residential systems provide.
Common Toilet Tank Problems and What They Mean:
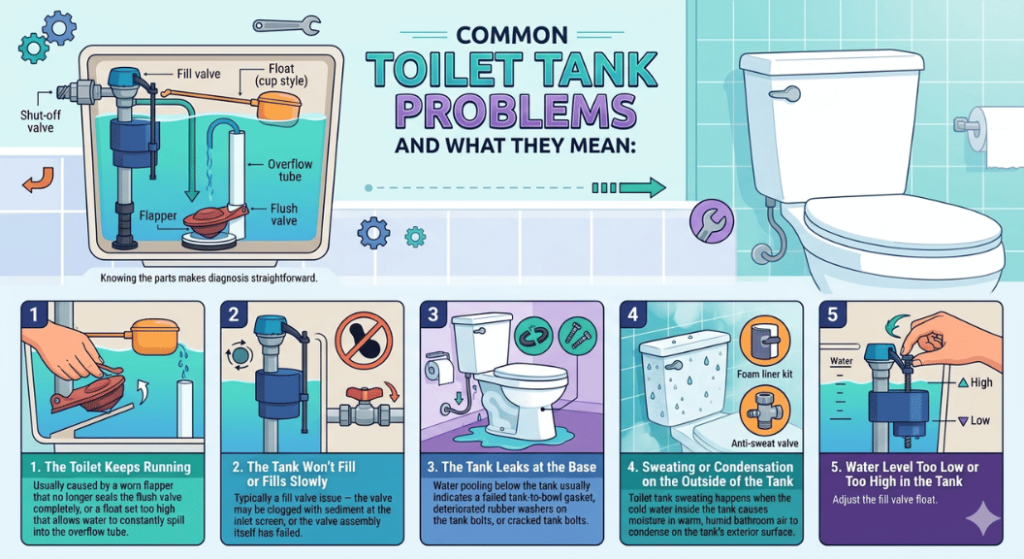
Knowing the parts makes diagnosis straightforward.
The Toilet Keeps Running:
The most common toilet problem. Usually caused by a worn flapper that no longer seals the flush valve completely, or a float set too high that allows water to constantly spill into the overflow tube. Check both before calling a plumber.
The Tank Won’t Fill or Fills Slowly:
Typically a fill valve issue — the valve may be clogged with sediment at the inlet screen, or the valve assembly itself has failed. The shut-off valve being partially closed is another common culprit worth checking first.
The Tank Leaks at the Base:
Water pooling below the tank usually indicates a failed tank-to-bowl gasket, deteriorated rubber washers on the tank bolts, or cracked tank bolts. This requires removing the tank for repair.
Sweating or Condensation on the Outside of the Tank:
Toilet tank sweating happens when the cold water inside the tank causes moisture in warm, humid bathroom air to condense on the tank’s exterior surface. Solutions include insulating the tank interior with a foam liner kit, or installing an anti-sweat valve that mixes a small amount of warm water into the supply line.
Water Level Too Low or Too High in the Tank:
Adjust the fill valve float. Most modern float-cup fill valves have a simple adjustment screw or clip that raises or lowers the float position to change the shutoff water level.
Toilet Tank Maintenance: Keeping Everything Working Properly:
Cleaning the Tank Interior:
The inside of a toilet tank can accumulate mineral deposits (calcium and lime from hard water), rust from corroded components, mold, and bacterial biofilm. Cleaning every six months is a good practice. The most effective and safe method is to pour 2 cups of white vinegar into the tank (without draining it), let it sit for 30 minutes to an hour, then flush several times. For heavier buildup, citric acid dissolved in water works well. Avoid harsh bleach tablets in the tank — they accelerate the deterioration of rubber flappers and seals, creating more repair problems than they solve.
Inspecting Components Annually:
Once a year, lift the tank lid and observe a full flush cycle. Watch that the flapper seats fully, the fill valve shuts off completely, the water level is correct, and no water is running into the overflow tube. Early detection saves significant water and repair costs.
When to Replace Tank Parts:
- Flapper: Every 4–5 years, or immediately if the toilet runs
- Fill valve: Every 7–10 years, or if the refill is slow or noisy
- Tank bolts and washers: Every 10–15 years, or if any moisture appears at the base of the tank
- Supply line: Every 10 years as a precautionary measure; braided stainless lines are far more reliable than plastic
Toilet Tank Replacement Parts: Brands, Compatibility, and Costs:
Universal vs. Brand-Specific Parts:
Many toilet tank components — particularly flappers, fill valves, and flush handles — come in universal versions designed to fit a wide range of toilet brands. However, some manufacturers (Kohler, American Standard, Mansfield, Gerber, Toto) use proprietary designs that require brand-specific parts for proper fit and function.
When purchasing replacement parts, always check the toilet model number (usually stamped inside the tank on the back wall or underside of the lid) and match it to the parts manufacturer’s compatibility list.
Estimated Replacement Part Costs:
| Component | Typical Cost (DIY) |
| Flapper | $5–$15 |
| Fill valve | $10–$30 |
| Flush handle | $10–$25 |
| Tank bolts and gasket kit | $10–$20 |
| Tank-to-bowl gasket | $8–$18 |
| Complete rebuild kit | $20–$50 |
| Full tank replacement | $50–$200+ |
Labor costs for a plumber to replace internal tank parts typically range from $75 to $200 depending on your region and the complexity of the repair.
Frequently Asked Questions:
What are the main parts inside a toilet tank?
The main parts inside a toilet tank are the fill valve (ballcock), float, overflow tube, flush valve, flapper, lift chain, flush handle, lift arm, and refill tube. Together, these components store water, control the flush cycle, refill the tank, and prevent overflows. Each part has a distinct mechanical role, and failure in any one of them typically causes a specific, recognizable symptom like a running toilet, slow fill, or incomplete flush.
How does a toilet tank work?
When you press the flush handle, the lift arm raises the flapper via the chain, opening the flush valve and releasing stored water into the bowl. Gravity drives the water rapidly through the bowl and trapway, flushing waste away. As the tank empties, the float drops, opening the fill valve, which refills the tank from the supply line. When water reaches the correct level, the float rises and closes the fill valve. The entire cycle takes 60 to 90 seconds.
Why is my toilet tank not filling with water?
A toilet tank that won’t fill usually has a faulty or clogged fill valve, a closed or partially closed shut-off valve, or a float that is stuck in the high (closed) position. Start by checking that the shut-off valve behind the toilet is fully open. Then inspect the fill valve for debris in the inlet screen. If the valve is worn or damaged, replacing it is a straightforward DIY repair.
Why does my toilet tank keep running?
A constantly running toilet is almost always caused by a worn or warped flapper that no longer seals the flush valve completely, allowing water to slowly leak into the bowl. It can also be caused by the water level being set too high, so water continuously spills into the overflow tube. Replacing the flapper (a $5–$10 repair) solves the problem in the majority of cases.
Is the water in a toilet tank clean?
Yes. The water inside a toilet tank comes directly from the household drinking water supply and is the same clean water that flows from your kitchen faucet — until it sits in the tank. Over time, mineral deposits, sediment, and biological growth (mold, bacteria) can develop on the tank’s interior surfaces. The water itself is not used for anything other than flushing, so its cleanliness primarily matters for the longevity of rubber components inside the tank.
How do I clean the inside of a toilet tank?
Turn off the water supply, flush to empty most of the tank, then spray or pour a cleaning solution (white vinegar, citric acid, or a dedicated tank cleaner) onto all interior surfaces. Let it sit for 30–60 minutes to dissolve mineral buildup, then scrub with a long-handled brush and turn the supply back on to flush the tank clean. Avoid bleach tablets — they degrade rubber parts over time.
What causes a toilet tank to leak from the bottom?
Leaks at the base of a toilet tank are typically caused by deteriorated rubber washers on the tank-to-bowl bolts, a failed tank-to-bowl gasket (spud gasket), or cracked porcelain. Tightening the bolts sometimes stops the leak temporarily; replacing the bolt kit and gasket is the proper long-term fix. Cracked porcelain requires replacing the tank or entire toilet.
How do I adjust the water level in a toilet tank?
On modern fill valves with a float cup, locate the adjustment clip or screw on the float cup and slide it up to raise the water level or down to lower it. On older ball-float designs, bend the float arm gently downward to lower the water level or upward to raise it. The correct level is about 1 inch below the top of the overflow tube.
Can I replace just the toilet tank without replacing the whole toilet?
In most two-piece toilets, yes — you can replace just the tank if the bowl is still in good condition. You must match the replacement tank to the toilet brand and model for correct bolt spacing and bowl inlet size. Complete replacement tanks are available from most plumbing supply stores and run $50 to $200 or more for name-brand models.
What is the toilet tank-to-bowl gasket and when should I replace it?
The tank-to-bowl gasket (spud gasket) is the large rubber donut-shaped seal between the bottom of the tank and the top of the bowl inlet. It prevents water from leaking at their junction. Replace it whenever you notice moisture or water stains around the base of the tank, or any time you remove the tank for other repairs, since reusing a compressed old gasket often results in leaks.
How long do toilet tank parts last?
Flappers typically last 4–5 years. Fill valves last 7–10 years. Tank bolts and rubber washers can last 10–15 years. The porcelain tank body itself can last 50 or more years if not cracked. The most vulnerable components are the rubber and silicone parts, which degrade faster in households with heavily chlorinated water or those using in-tank chemical cleaners.
What is the overflow tube in a toilet tank?
The overflow tube is a vertical standpipe inside the tank (usually part of the flush valve assembly) that prevents the tank from overflowing if the fill valve fails to shut off. Excess water flows down the tube and into the bowl rather than over the tank rim. Its height determines the maximum water level in the tank — the water level should sit about 1 inch below the tube’s opening.
Why is there mold in my toilet tank?
Mold grows in toilet tanks when organic matter (minerals, sediment) provides nutrients and the environment stays dark and humid. Infrequently used toilets are most susceptible. Cleaning the tank thoroughly with white vinegar, which has antifungal properties, usually eliminates the problem. Adding a few drops of tea tree oil or a septic-safe tank tablet can help prevent regrowth. Black mold should be addressed promptly; while tank mold is generally not directly dangerous, the CDC notes that mold exposure can cause respiratory irritation.
What is the difference between a fill valve and a flush valve?
These are two distinct components with opposite jobs. The fill valve controls water flowing into the tank from the supply line, refilling it after each flush. The flush valve controls water flowing out of the tank into the bowl during a flush. The fill valve is on the left side of the tank (typically); the flush valve is in the center-bottom.
Can you put bleach or vinegar in a toilet tank?
White vinegar is safe and effective for cleaning a toilet tank and won’t harm internal components. Bleach is problematic — while it kills bacteria effectively, it rapidly accelerates the deterioration of rubber flappers and seals, leading to more frequent replacements and potential leaks. Avoid in-tank bleach tablets for this reason. If you use bleach, dilute it heavily and do not leave it sitting in the tank.
Why does my toilet tank sweat (condensation on the outside)?
Tank sweating occurs when warm, humid bathroom air contacts the cold outer surface of the tank, causing water vapor to condense. It’s more common in summer or in humid climates. Solutions include insulating the interior of the tank with a foam liner kit (which prevents the tank surface from getting as cold), improving bathroom ventilation, or installing an anti-sweat valve that introduces a small amount of warm water into the supply, raising the tank water temperature slightly.
What is a pressure-assist toilet tank?
A pressure-assist toilet uses compressed air stored inside a sealed pressure vessel within the tank. When flushed, the pressurized air forces water into the bowl much faster than gravity alone, producing a powerful flush with less water. These toilets are louder than standard gravity-fed models and cost more to repair, but are excellent choices for households with frequent clog problems or low water pressure situations.
How do I know if my toilet fill valve needs replacing?
Signs of a failing fill valve include: the tank fills very slowly, the fill valve makes hissing or gurgling sounds after the tank should be full, water continuously runs even when the tank is full, or the valve visibly drips or leaks. A replacement fill valve costs $10–$30 and can be installed in about 30–60 minutes with basic tools.
What are toilet tank bolts and why do they leak?
Tank bolts are the metal fasteners (usually two, sometimes three) that secure the tank to the bowl. Each bolt has rubber and metal washers on both sides of the tank bottom, secured by a nut underneath. They leak when the rubber washers compress, crack, or harden with age, or when the bolts corrode. Tightening them gently (never overtighten porcelain) may provide a temporary fix, but replacing the full bolt kit — available for $10–$20 — is the correct solution.
Is it safe to put fabuloso or other household cleaners in a toilet tank?
This is a popular internet trend, but it is not recommended by plumbing professionals. Detergents and surfactants in products like Fabuloso are not designed for continuous contact with rubber seals, gaskets, and valve components. Over time, they can cause rubber parts to deteriorate, leading to leaks and malfunctions. The toilet bowl is the appropriate place for cleaning agents; the tank should be cleaned only with products specifically designed for it, or with diluted white vinegar.
How do dual-flush toilet tanks work?
Dual-flush toilets use a modified flush valve with two actuators — typically two buttons on top of the tank. Pressing the small button activates a partial flush (usually 0.8 to 1.0 gallon) that releases only a portion of the stored water, sufficient for liquid waste. The large button triggers a full flush (1.28 to 1.6 gallons) for solid waste. This mechanism can reduce a household’s toilet water consumption by 20–30% compared to single-flush models, according to WaterSense data.
What causes brown or rust-colored water in a toilet tank?
Rust-colored water typically indicates corrosion from aging tank bolts, metal components inside the tank, or iron in the household water supply. Heavily corroded bolt hardware should be replaced. If the rust originates from the water supply itself, a whole-house sediment filter or water softener may be needed. Iron bacteria — microscopic organisms that metabolize dissolved iron — can also create orange-brown slime in tanks served by well water.
How much water does a toilet tank hold?
Modern toilets manufactured after 1994 (when federal standards took effect in the U.S.) hold 1.28 to 1.6 gallons per flush. High-efficiency toilets (HETs) may use as little as 1.0 gallon. Older toilets installed before 1994 commonly held 3.5, 5, or even 7 gallons per flush. If your home has older toilets, replacing them with WaterSense-certified models is one of the most impactful water conservation steps a homeowner can take.
Can a cracked toilet tank be repaired?
Small, hairline cracks in the tank exterior above the waterline can sometimes be repaired with waterproof epoxy or porcelain repair compound as a temporary measure. However, any crack at or below the waterline is a serious structural failure — water pressure will worsen the crack over time, and failure could result in a sudden flood. In that case, replacing the tank (or the entire toilet) is the only reliable solution. Cracked porcelain is inherently unpredictable and should not be trusted long-term with a patched repair.


Leave a Reply